Automate File Loading with AWS and Snowflake
About this Post
This is part 2 of a series that shows the ease and speed of aggregating files into Snowflake. This is particularly interesting for gathering data from many sources so that Analysts and Data Scientists can find new insights. The first post works well for use cases of one-time or infrequent loads. This post presents a great way to automate ongoing operations.
Using Snowflake and AWS automation and principles outlined in this post remove unnecessary constraints and grow your platform fast. One of the most challenging barriers to past analytics efforts was getting regular data feeds from multiple data sources. Sure, one core system, but if you’ve seen it, think of all the others systems that wouldn’t or couldn’t conform. That’s because solutions tended to be database vendor-centric. This resulted in fractured analytics properties throughout your portfolio and incomplete analytics. But, with Snowflake and your cloud provider there is a better way that removes those barriers.
Imagine a “set it and forget it” model where you can tell your various application’s DBA’s to just send a file whenever you want, however often you want. Don’t worry about a schedule because our drive-through is open 24/7. Don’t worry about how small the file is. And it can be in a simple CSV or JSON format: no proprietary file formatting needed.
This represents removing constraints put upon you by frameworks that require proprietary or clunky file formats, clock schedules that can be missed causing loss of visibility and confidence, and waiting until your file is “big enough” to make it worth while.
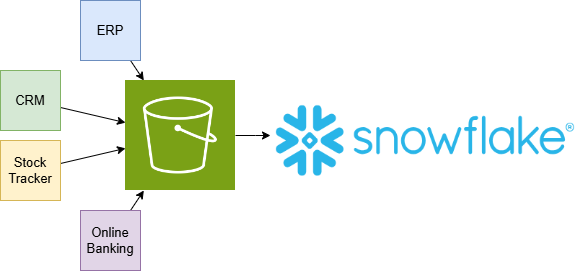
Using AWS’s S3 Simple Queue Service with Snowflake pipes, we’ll have AWS sending notifications to Snowflake to get files as they are uploaded.
You’ll see we hop back and forth between AWS and Snowflake quite a bit to set up communications.
- AWS: Configure AWS Permissions - Create a Role
- Snowflake: Create a storage integration with outputs from step 1
- AWS: Configure AWS Permissions - Create a policy with outputs from step 2
- Snowflake: Setup the STAGE, PIPE, and a ROLE
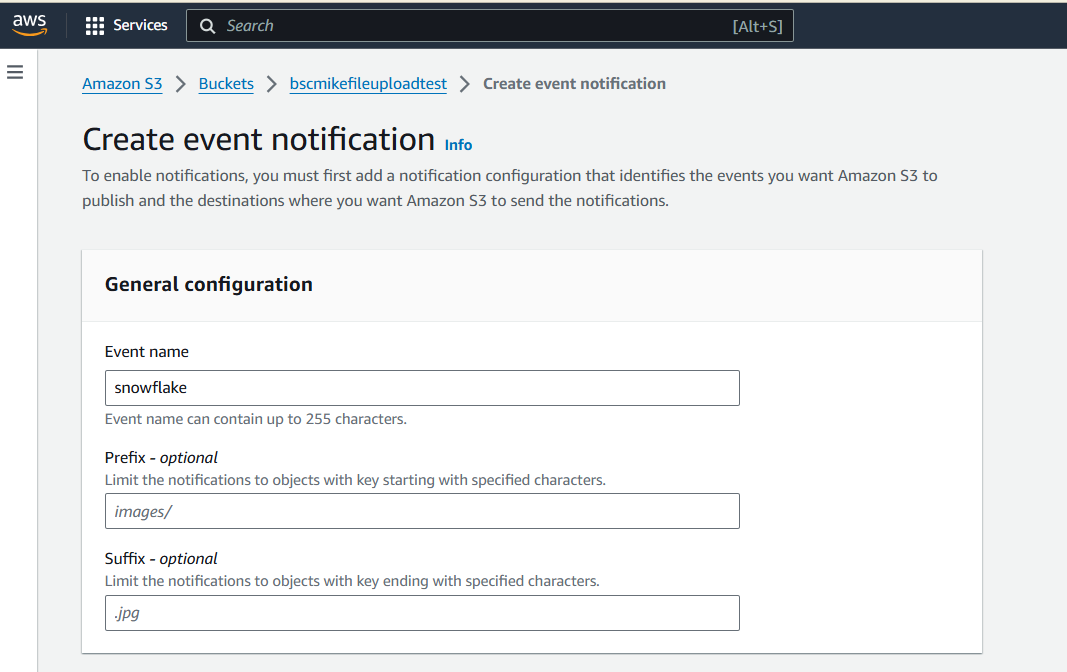
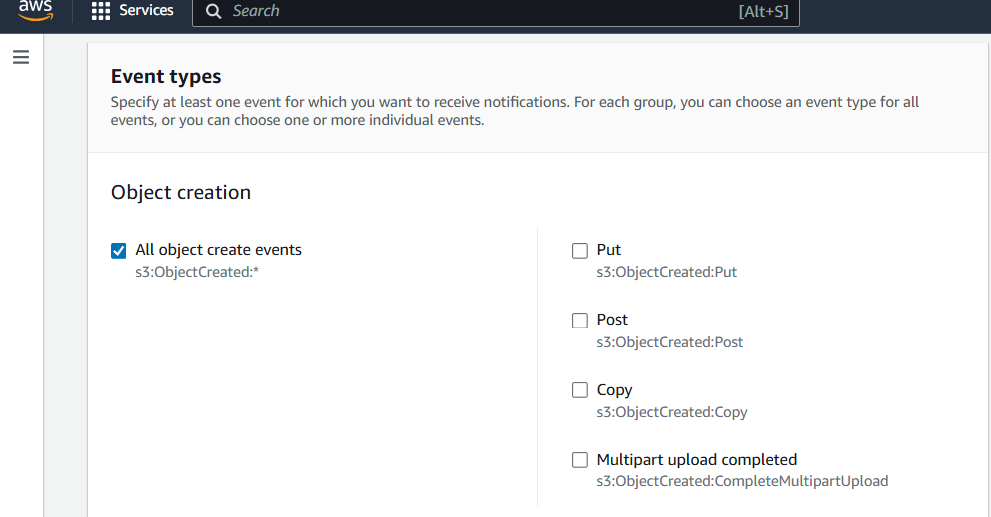
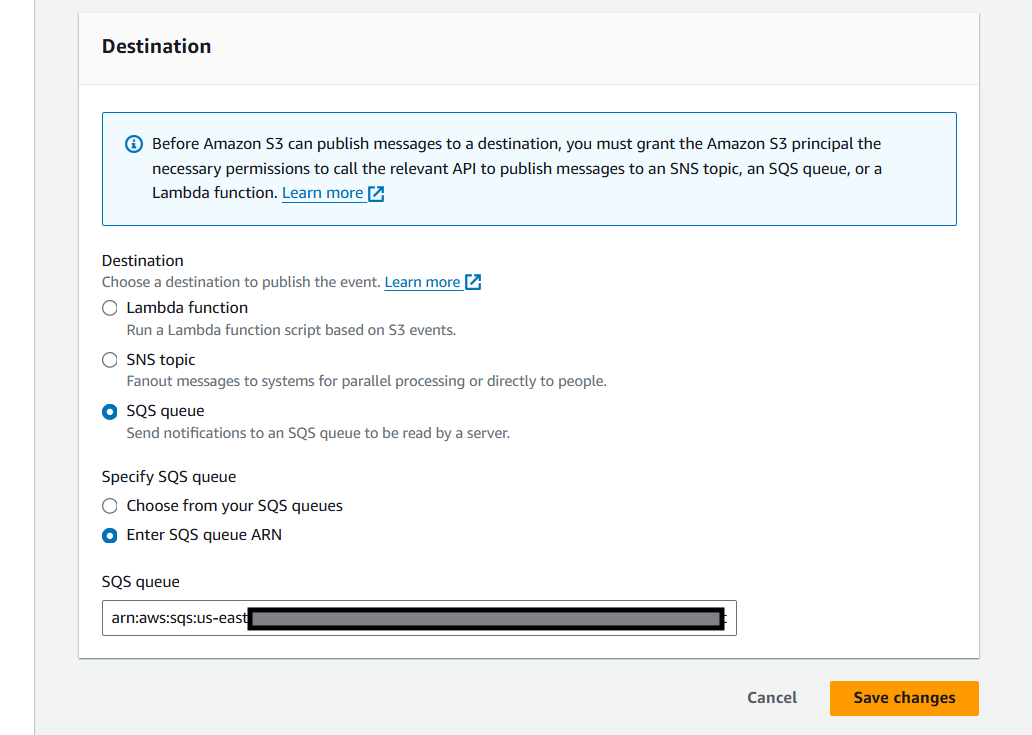
- AWS: Configure the S3 Event Notifications
- Send your files to AWS and automatically ingest them into your table.
Configure AWS Permissions - Create a Role
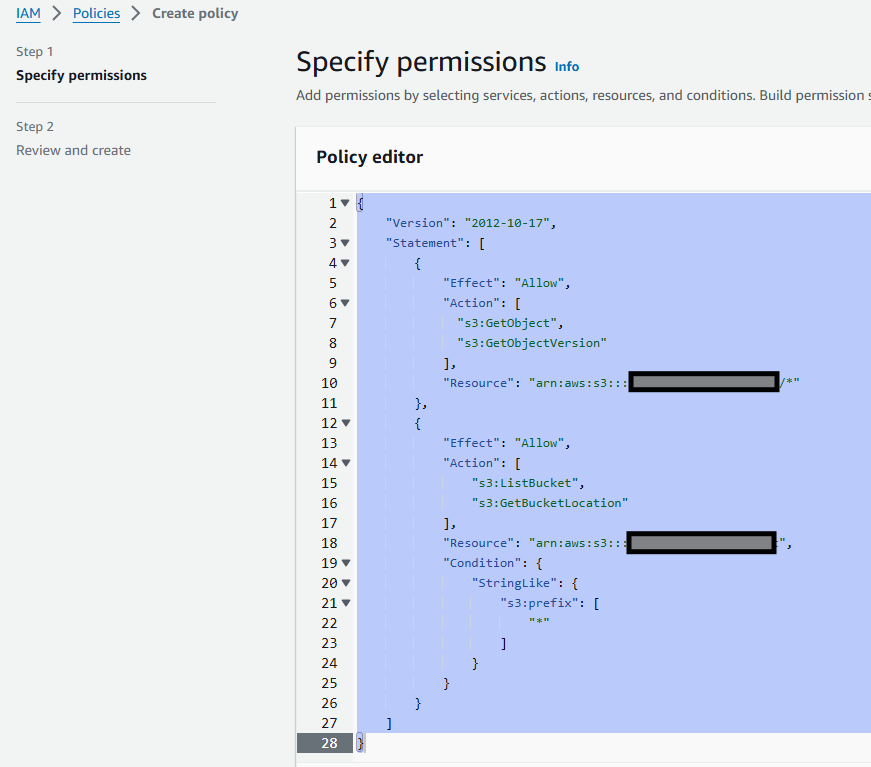
Create a policy in AWS’s IAM section. You’ll need to substitute your bucket name where you see <bucket-name>.
{
    "Version": "2012-10-17",
    "Statement": [
        {
            "Effect": "Allow",
            "Action": [
              "s3:GetObject",
              "s3:GetObjectVersion"
            ],
            "Resource": "arn:aws:s3:::<bucket-name>/*"
        },
        {
            "Effect": "Allow",
            "Action": [
                "s3:ListBucket",
                "s3:GetBucketLocation"
            ],
            "Resource": "arn:aws:s3:::<bucket-name>",
            "Condition": {
                "StringLike": {
                    "s3:prefix": [
                        "*"
                    ]
                }
            }
        }
    ]
}
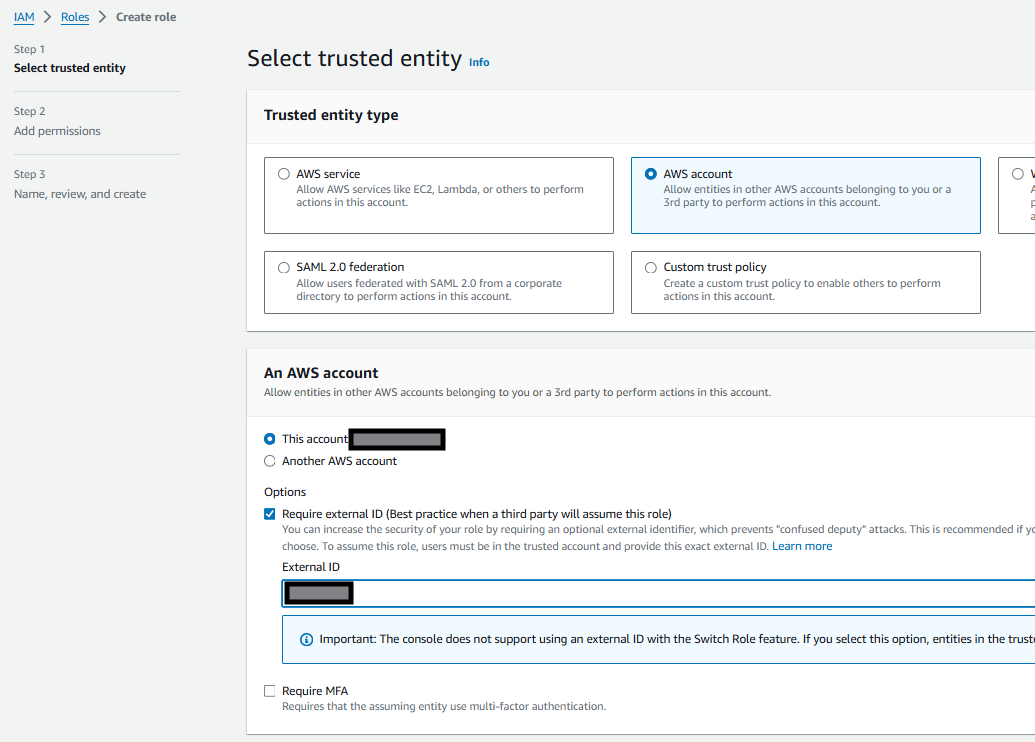
Create a role that will be used by Snowflake. First, we configure it to work with your user ID because we don’t have the integration details from Snowflake yet.
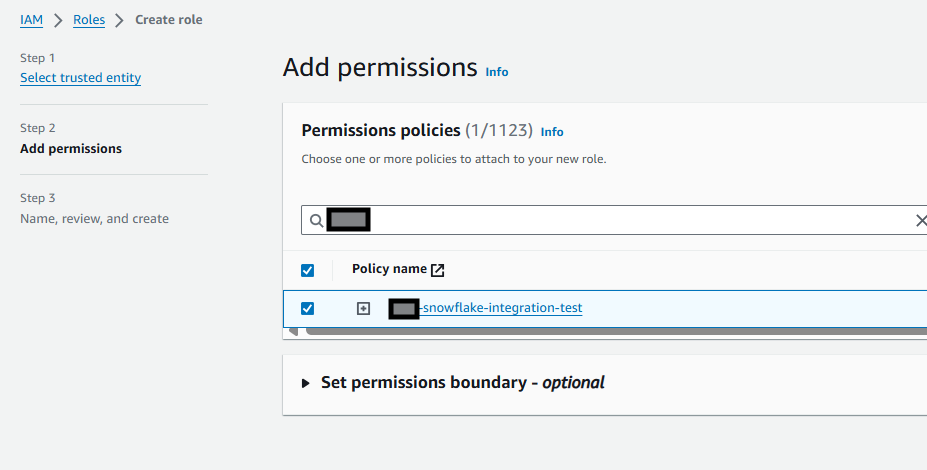
On the next screen, give it a name and description, then save.
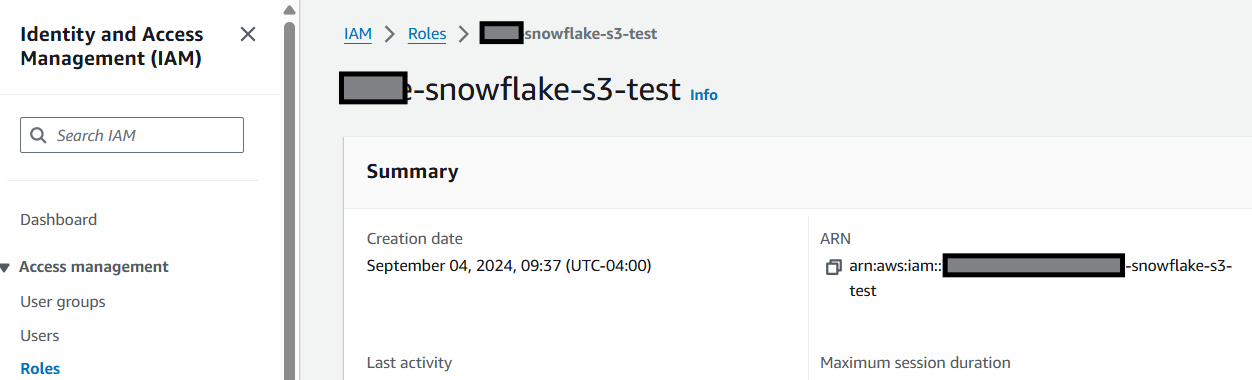
Record the ARN as it will be used in the next step in Snowflake. It looks like arn:aws:iam::123123123123:role/my-snowflake-s3-test
Create a storage integration
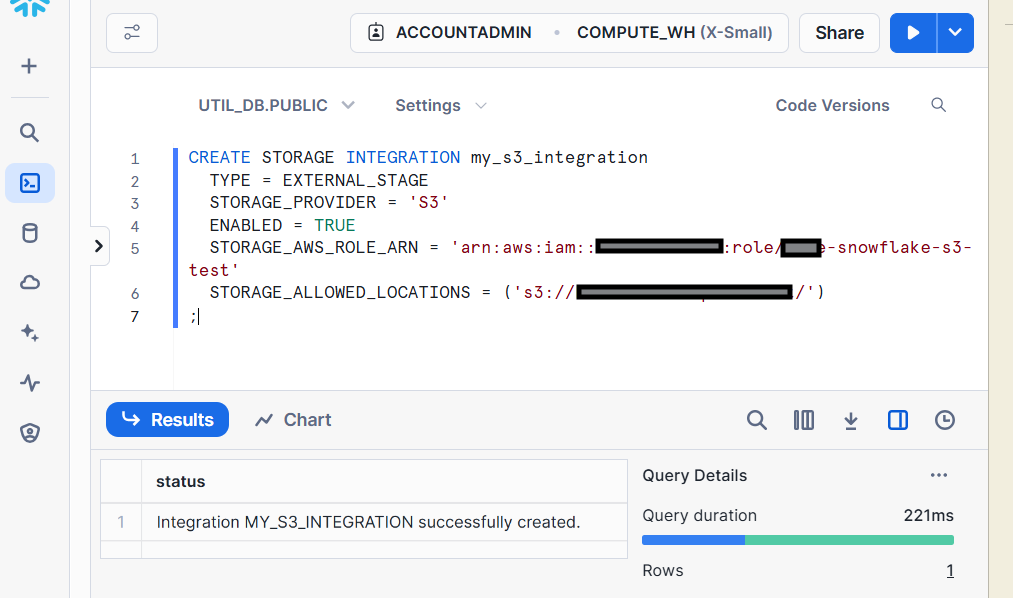
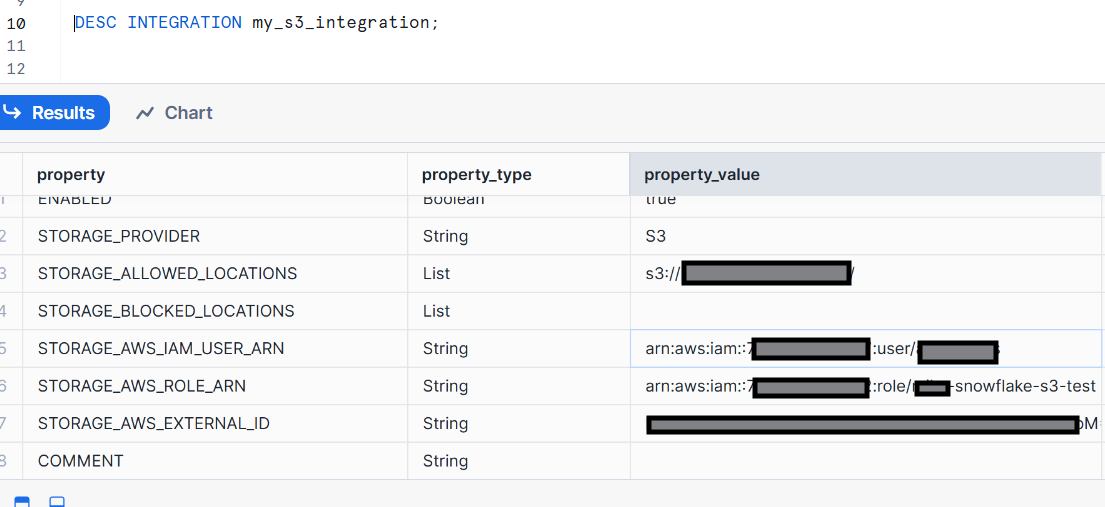
Here’s an example of how we create the integration between Snowflake and our AWS S3 bucket. Notice that the second statement is a “describe”; record the STORAGE_AWS_ROLE_ARN and STORAGE_AWS_EXTERNAL_ID values which will be used in a later step.
CREATE STORAGE INTEGRATION my_s3_integration
  TYPE = EXTERNAL_STAGE
  STORAGE_PROVIDER = 'S3'
  ENABLED = TRUE
  STORAGE_AWS_ROLE_ARN = 'arn:aws:iam::123123123123:role/my-snowflake-s3-test'
  STORAGE_ALLOWED_LOCATIONS = ('s3://<bucket-name>/')
  [ STORAGE_BLOCKED_LOCATIONS = ('s3://<bucket-name>/') ]

DESC INTEGRATION my_s3_integration;
Configure AWS Permissions - Part 2 - Create a Policy
Head back over to AWS with your new STORAGE INTEGRATION’s STORAGE_AWS_ROLE_ARN and STORAGE_AWS_EXTERNAL_ID. Navigate back to the IAM Role you created and edit the policy with Snowflake’s values.
{
    "Version": "2012-10-17",
    "Statement": [
    {
      "Sid": "",
      "Effect": "Allow",
      "Principal": {
        "AWS": "<arn from STORAGE_AWS_IAM_USER_ARN>"
      },
      "Action": "sts:AssumeRole",
      "Condition": {
        "StringEquals": {
          "sts:ExternalId": "<external_id from STORAGE_AWS_EXTERNAL_ID>"
        }
      }
    }
  ]
}
Make it stick by clicking “update the policy”.
Final Setup in Snowflake
Now we have set up both AWS and Snowflake so we can communicate securely between them. We need two things in Snowflake for this part of the automation, and then just one more setup step in AWS.
CREATE STAGE mystage
  URL = 's3://<bucket-name>/'
  STORAGE_INTEGRATION = my_s3_integration;
CREATE PIPE snowpipe_db.public.mypipe
  AUTO_INGEST = TRUE
  AS
    COPY INTO snowpipe_db.public.mytable
      FROM @snowpipe_db.public.mystage
      FILE_FORMAT = (type = 'CSV', SKIP_HEADER=1);
-- Create a role to contain the Snowpipe privileges
USE ROLE SECURITYADMIN;

CREATE OR REPLACE ROLE snowpipe_role;

-- Grant the required privileges on the database objects
GRANT USAGE ON DATABASE FIN_TXN TO ROLE snowpipe_role;

GRANT USAGE ON SCHEMA FIN_TXN.STOCK_TRADES TO ROLE snowpipe_role;

GRANT INSERT, SELECT ON FIN_TXN.STOCK_TRADES.ROOT_DEPTH TO ROLE snowpipe_role;

GRANT USAGE ON STAGE FIN_TXN.STOCK_TRADES.mystage TO ROLE snowpipe_role;

-- Pause the pipe for OWNERSHIP transfer
ALTER PIPE s3pipe SET PIPE_EXECUTION_PAUSED = TRUE;

-- Grant the OWNERSHIP privilege on the pipe object
GRANT OWNERSHIP ON PIPE FIN_TXN.STOCK_TRADES.s3pipe TO ROLE snowpipe_role;

-- Grant the role to a user
GRANT ROLE snowpipe_role TO USER "MYUSER";

-- Set the role as the default role for the user
ALTER USER "MYUSER" SET DEFAULT_ROLE = snowpipe_role;

-- Resume the pipe
ALTER PIPE s3pipe SET PIPE_EXECUTION_PAUSED = FALSE;
Final Setup in AWS
Get Started
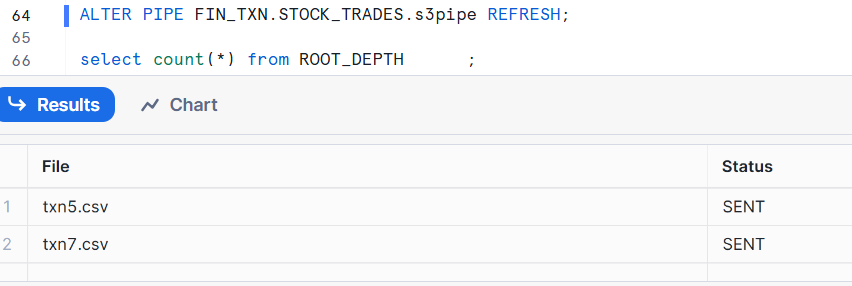
In case you have any files already staged there, you wouldn’t get a notification for the files being created, so you need to prime the integration by using an ALTER PIPE ____ REFRESH;. That will pull all the existing files that meet your patterns into Snowflake.
In the real world, the next step is to get your individual transactional system to dump key data to CSV files and copy it to your cloud storage. Note: if you have JSON use cases, simply change your COPY INTO in your pipe; Snowflake has powerful yet easy-to-use JSON commands.
For purposes of this post, I had ChatGPT write a simulation program to generate files for me. I just told it to generate a python script that creates a CSV file with columns that match my column headings and some randomization. datafile.py generates the number of rows I want in the file name I want. And then I upload that to AWS via s3 cp. (I have already configured my AWS CLI and logged in.)
python datafile.py 10000 data.csv
aws s3 cp data.csv s3://<bucket-name>/
When you send that file up to S3 from your workstation, give it a little time to process. Even though the processing itself can be less than a second for 10,000 records, it might take 30-40 seconds (or more) for the file to get picked up.
Check your tables to see them being loaded up!
Troubleshooting
To understand how this all works, you might want to pick up a few troubleshooting tricks.
First, keep an eye on how many records are in your target table.
select count(*) from ROOT_DEPTH;
The activity of your pipe is to copy data from a stage to a table. So, you can use the copy_history command to find out the results of the COPY INTO from your PIPE.
select *
from table(information_schema.copy_history(TABLE_NAME=>'ROOT_DEPTH', START_TIME=> DATEADD(hours, -1, CURRENT_TIMESTAMP())))
order by last_load_time desc
;
You can check if your pipe is actually seeing files and if it passes or fails processing them with SYSTEM$PIPE_STATUS.
select SYSTEM$PIPE_STATUS( 's3pipe' );
Conclusion
This post steps through the integration between AWS and Snowflake for the purpose of Snowflake loading files in AWS. The post demonstrated that there are sequential steps that must be done in order due to the information or state of a step being required in the subsequent step. If you skip a step, it won’t work. But if you follow them all you will have created a pipeline that is simple to use from any application that has data to share.
Analytics platforms will add tremendous value to your business. You can maximize the value of your investment by minimizing constraints such as file movement schedules and proprietary data types. Get this set up right in the beginning and you will see rapid growth and adoption.