Azure Managed Identities with Event Hub's Kafka
A How-To guide with code examples, screenshots, and explanations.
More Secure Integrations for Event-Driven Applications in Azure
Azure Event Hub is an event processing service built for high volumes of events and data. Event-driven applications can take advantage of this service to enable a highly responsive application or integration architecture. Kafka is a mature, open-source service for data stream processing, widely adopted over more than 15 years. Event Hub offers an interface to make it compatible with applications written for Kafka.
In a modern zero-trust application architecture, systems need to authenticate with each other to prevent unauthorized access. Azure offers a solution for managing “non human” accounts that are needed for this kind of authentication. Managed Identities offer passwordless access whose internal keys are rotated by Azure. Access to those keys is enabled programmatically when needed so they are never stored. This means the non human account’s password can’t be accidentally shared with a bad actor, and won’t be misused by a well-meaning person who can’t wait for another account to be provisioned.
This article describes how to use Kafka’s API in Event Hubs with a Managed Identity, from the context of Java Spring code running in Azure Container Apps. We will build and then leverage the below Azure resources. These concepts and code can be adopted to other situations.
- Azure Event Hubs with Kafka enabled
- Azure Container Environment and Azure Container Apps (ACA)
- Azure Managed identity, assigned to the ACA with privileges on the Event Hub
- Azure Container Registry to store images for ACA
Set up Infrastructure
We rely on Terraform, it’s azurerm provider, and the Azure Command Line Interface (AZ CLI). You should install those from the Hashicorp (Terraform) and Microsoft sites first.
Terraform
The below Terraform code will define the environment.
The Foundation
Define your provider; update your subscription. Use the data block of azurerm_client_config to get subscription and tenant info more easily so you don’t have to type them. Give your resource group a meaningful name and add a key vault for secrets that we’ll store.
    provider "azurerm" {
        subscription_id = "<your subscription ID>"
        features {}
    }

    data "azurerm_client_config" "myapp" {}

    resource "azurerm_resource_group" "myapp" {
        name     = "myapp-resources"
        location = "East US"
    }

    resource "azurerm_key_vault" "myapp" {
        name                = "myappkeyvault"
        resource_group_name = azurerm_resource_group.myapp.name
        location            = azurerm_resource_group.myapp.location
        sku_name            = "standard"
        tenant_id           = data.azurerm_client_config.myapp.tenant_id
    }
Container Registry
Reference your resource group created above and define an ACR. We also will store that ACR’s admin password securely in a key vault, so we can use it later.
    resource "azurerm_container_registry" "myapp" {
        name                = "myappregistry"
        resource_group_name = azurerm_resource_group.myapp.name
        location            = azurerm_resource_group.myapp.location
        sku                 = "Basic"
        admin_enabled       = true
    }

    resource "azurerm_key_vault_secret" "reg_pw" {
        key_vault_id = azurerm_key_vault.myapp.id
        name         = "myappregistry-pw"
        value        = azurerm_container_registry.myapp.admin_password
    }
Define the Event Hub with Kafka API
Event Hub is really a hierarchy of objects and services. We define a top level Namespace, and it contains a single hub for our test. You will likely be splitting out messages into many Hubs.
resource "azurerm_eventhub_namespace" "myapp_ns" {
  name                = "myapp-namespace"
  location            = azurerm_resource_group.myapp.location
  resource_group_name = azurerm_resource_group.myapp.name
  sku                 = "Standard"
  local_authentication_enabled = false  # disables access keys
  capacity            = 1
  tags = {
    environment = "dev"
  }
}

# Create the Event Hub within the namespace
resource "azurerm_eventhub" "myapp_hub" {
  name                = "myapp-eventhub"
  namespace_name      = azurerm_eventhub_namespace.myapp_ns.name
  resource_group_name = azurerm_resource_group.myapp.name
  partition_count     = 2
  message_retention   = 1
}
Define the Managed Identity and its Roles
This is a key part here. First, define a User Assigned Managed Identity. We will later assign that to the ACA. We also need to make sure it has roles to connect to the ACR to get images and access the Event Hub.
resource "azurerm_user_assigned_identity" "myapp" {
  name                = "myapp-identity"
  resource_group_name = azurerm_resource_group.myapp.name
  location            = azurerm_resource_group.myapp.location
}

resource "azurerm_role_assignment" "acr_pull" {
  for_each             = { AcrPull = "", Reader = "" }
  principal_id         = azurerm_user_assigned_identity.myapp.principal_id
  role_definition_name = each.key
  scope                = azurerm_container_registry.myapp.id
}

 Grant the User Assigned Identity Data Owner permissions to the Event Hub Namespace
resource "azurerm_role_assignment" "myapp_eventhub_data_owner" {
  scope                = azurerm_eventhub_namespace.myapp_ns.id
  role_definition_name = "Azure Event Hubs Data Owner"
  principal_id         = azurerm_user_assigned_identity.myapp.principal_id
}
Container App
Create a minimally configured Container App Environment, and then an app. The image definition won’t really work until you publish an image, but the ACA should create. In our case we are allowing access to services on our container’s port 8080, though in this example we aren’t really using that. Note where we are assigning the user assigned identity.
resource "azurerm_container_app_environment" "myapp" {
  name                = "myapp-environment"
  resource_group_name = azurerm_resource_group.myapp.name
  location            = azurerm_resource_group.myapp.location
}

resource "azurerm_container_app" "myapp" {
  name                         = "myapp"
  container_app_environment_id = azurerm_container_app_environment.myapp.id
  resource_group_name          = azurerm_resource_group.myapp.name
  revision_mode                = "Single"

  template {
    container {
      name   = "myapp"
      image  = "${azurerm_container_registry.myapp.login_server}/myapp:latest"
      cpu    = 0.25
      memory = "0.5Gi"
    }
  }
  registry {
    server               = azurerm_container_registry.myapp.login_server
    username             = azurerm_container_registry.myapp.admin_username
    password_secret_name = "registry"
  }

  secret {
    name  = "registry"
    value = azurerm_container_registry.myapp.admin_password
  }

  ingress {
    external_enabled = true
    target_port      = 8080
    transport        = "auto"
    traffic_weight {
      percentage      = 100
      latest_revision = true
    }
  }
  identity {
    type         = "UserAssigned"
    identity_ids = [azurerm_user_assigned_identity.myapp.id]
  }

  depends_on = [azurerm_user_assigned_identity.myapp, azurerm_role_assignment.acr_pull, azurerm_key_vault_secret.reg_pw]
}
Extras
You’ll want Log Analytics Workspace, App Insights and Diagnostic settings enabled for debugging and troubleshooting.
resource "azurerm_log_analytics_workspace" "myapp" {
  name                = "myapp-law"
  resource_group_name = azurerm_resource_group.myapp.name
  location            = azurerm_resource_group.myapp.location
  retention_in_days   = 30
}
resource "azurerm_application_insights" "myapp" {
  name                = "myappappinsights"
  resource_group_name = azurerm_resource_group.myapp.name
  location            = azurerm_resource_group.myapp.location
  application_type    = "web"
}

resource "azurerm_monitor_diagnostic_setting" "myapp" {
  name                       = "myapp-diagnostic-setting"
  target_resource_id         = azurerm_application_insights.myapp.id
  log_analytics_workspace_id = azurerm_log_analytics_workspace.myapp.id

  metric {
    category = "AllMetrics"
  }
}
Run your terraform
Log into Azure.
az login
Set your subscription.
az account set --subscription <subscription-id-or-name>
Initialize the folder for Terraform.
terraform init
Create a Terraform plan and review the output to make sure it’s doing what you expect.
terraform plan
Apply the Terraform definitions and your resouces will be set up. Re-run plan and apply as needed; Terraform manages the state so you can re-run.
terraform apply
Important Validations
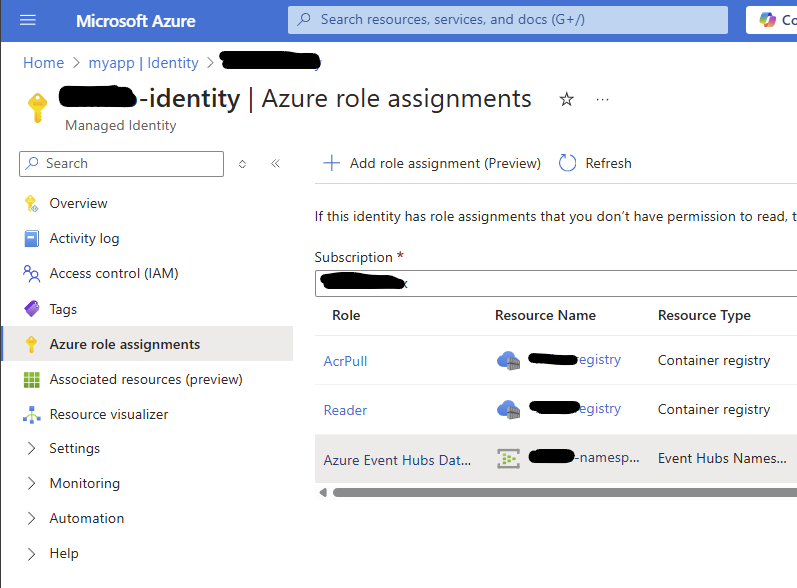
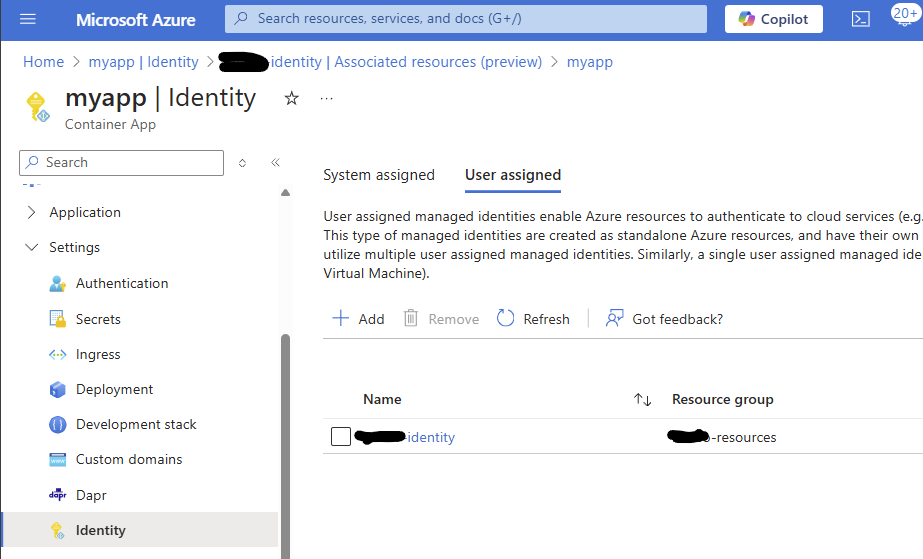
Review all your resources in the Azure Portal before proceeding, Particularly, make sure your Managed Identity has the right roles assigned to the Event Hub, and that it is assigned to your Azure Container App.
Java Code and Configuration
Use the source code from spring-eventhub-kafka. Clone that repo, and now we are going to customize it to your environment.
Configure Callback Handler
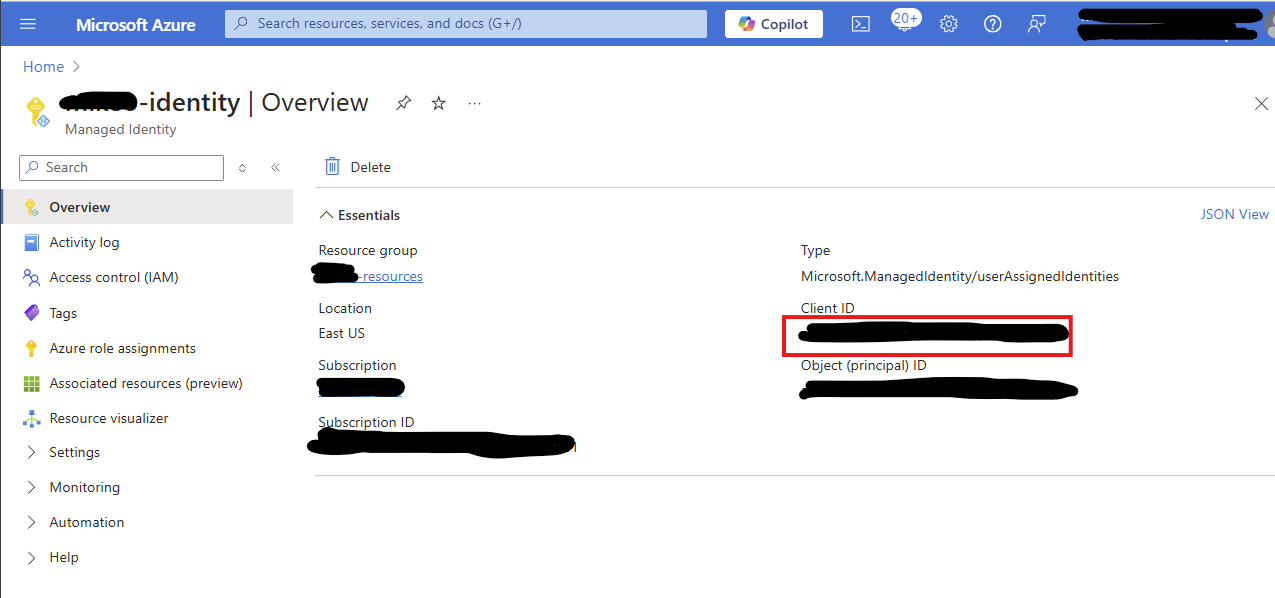
Replace <managedIdentityClientId> in CustomAuthenticateCallbackHander.java
To get that value, navigate to the Overview page of the Managed Identity that you created.
Configure Topic Name
Default topic is TOPIC=”test” in TestProducer.java. Change this to anything you would like.
Configure Properties
In our test, we are loading the file from the filesystem. This means the Docker image that we will create will need to find it in the working directory. So, when we build the Docker image, we will explicitly copy this one file to the image’s file system.
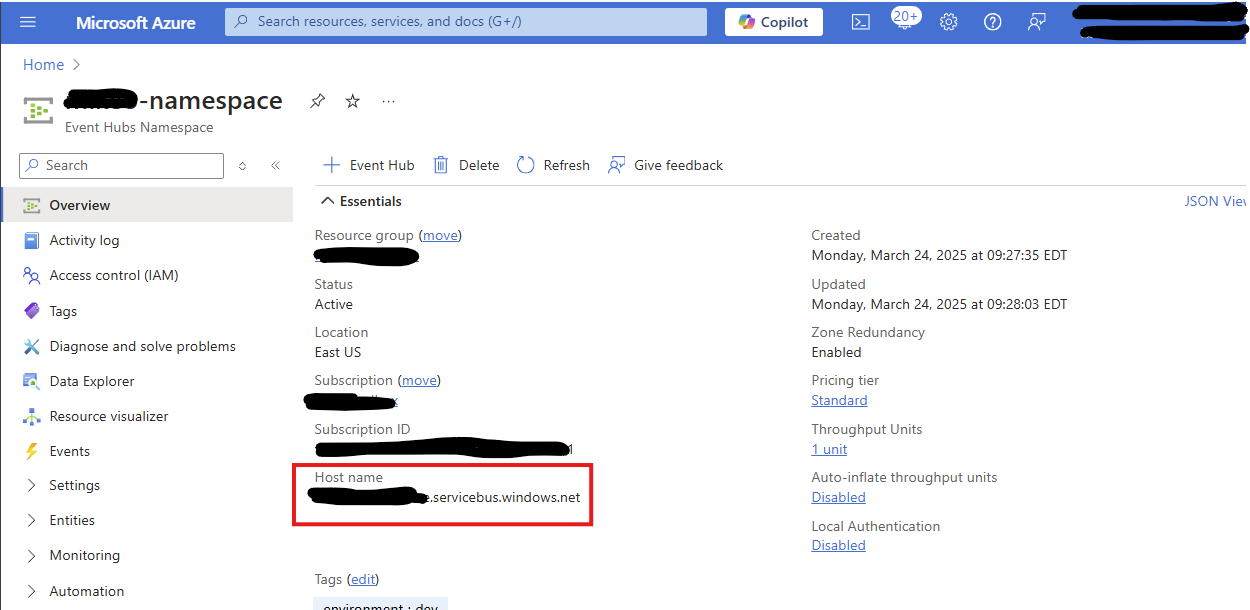
In producer.config, change <your event hub namespace> to the value for yours. It builds a URL which is displayed on the Event Hub Namespace overview page.
Deploy the Service
In the repo, there is a bash script that is intended to give you a quick start on compiling, building, and deploying the project. It depends on maven, the AZ CLI, and Docker CLI all being installed. I did this in a Windows Subsystem for Linux (WSL) environment.
Quick Start
Edit build.sh. Set ACR_NAME=”<my acr name>” which is the name you gave ACR in Terraform. Set IMAGE_NAME=”<app name>” which also would match the image name you did in the ACA definition.
Then just run it.
./build.sh
Validate Results
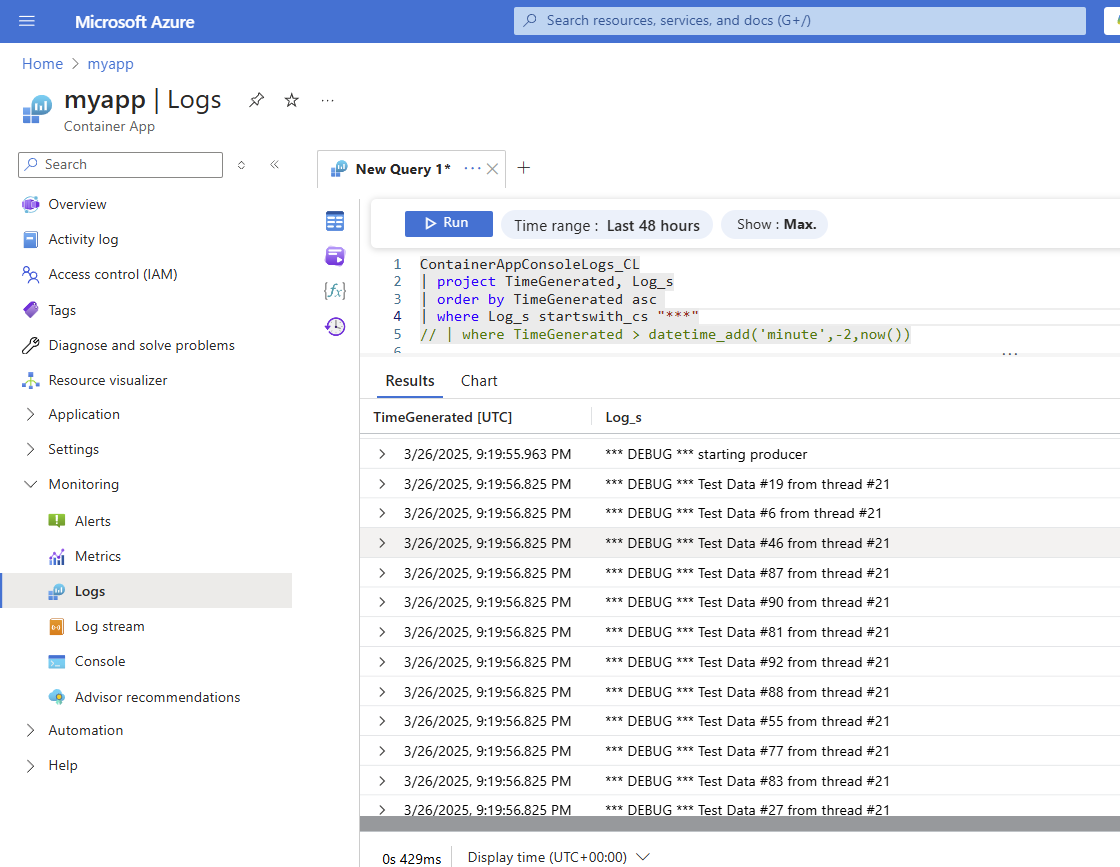
Now that your app has been deployed, you can watch it activate through the Azure Portal and review logs as they are created. Java logs especially when there are stack traces show best in ascending date/timestamp order. There’s an example KQL query you can use in kql.txt also.
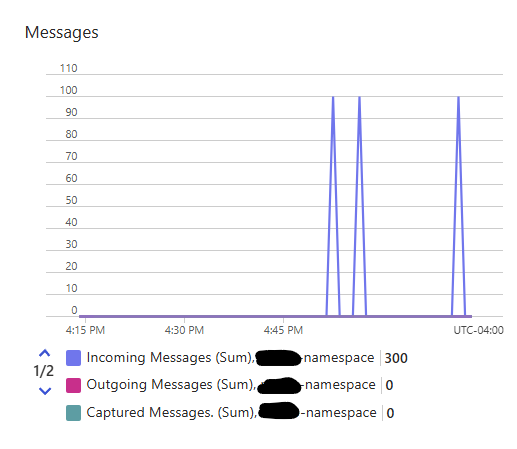
Event Hub Monitor
You can see the messages flowing by going to the Event Hub Namespace and viewing the monitor on the Overview page.
Log output
In my local copy, I added debug statements such as the below. Because we enabled monitoring and logging, these are available in the Logs blade of the Monitor menu on the left navigation. This is showing me that the statements were processed by the application and sent to Event Hubs.
System.out.println("*** DEBUG *** Test Data XXX");
Consumer Code
You most likely will also be writing a companion consumer or streaming client. That code, beyond the scope of this article, will provide proof that your messages are flowing.
Conclusion
I showed you how to create infrastructure and code, then how to validate the results that your application is using a secure method to drive system responses from events in Microsoft Azure.